Showing posts with label Pam Staples. Show all posts

Gift Wrapped Perfect Packaging


Perfect Packaging - The Terrific Tin


I just love the classic style of this Terrific Tin!  Basic Black and Very Vanilla come together for perfection in this small tin with a matching tag attached.  I used the Love Letter Designer Series Paper to create a classic package perfect for gift wrapping any small gift such as an engagement ring, ear rings or any of the Simply Adorned Charms.  


When I decorate packaging, I always measure dimensions then subtract approximately 1/8th to 1/4th from the dimensions of the cardstock and designer series paper that I use to create the finished packaging.  Since this is a round tin, I used the Circle Scissor Plus to cut out the different sized circles.


This tin also worked great for some Christmas Tags that I made.  To see the tags, come back tomorrow.

Top View

Side View along with matching tag
 SunnyGirlScraps Tips of the day:
  • Don't be afraid to dress up brown lunch bags or boxes to create unique gift packaging.
  • Think about recycling and reusing gift bags you've receive but add your own touch by using Stampin' Up! Designer Series Paper, card stock and stamps.
  • If you are a guy - don't worry about the overall outcome as you often it is the "attempt" that really matters!  One of my husbands greatest valentine gifts were a mini poem book he made along with a handmade cupcake box that kept falling apart.  We also have found family memories of the time my brother used ELECTRICAL tape to wrap Christmas Gifts because he didn't own any other tape.
  • Circle Scissor Plus - This can sometimes be a frustrating tool.  I've found the secret to cutting paper and card stock is to attach the material you are cutting to the glass mat using adhesive placed on the four corners of the paper.  It is also important to be patient.  I also keep the scraps especially as sometimes using the Circle Scissor Plus "wastes" paper.  Again, keep in mind the idea of "recycling" your cut pieces of paper.
Like this project?  Please share your thoughts or questions by leaving me a comment below.  I love hearing from all my readers and also encourage you to share my blog with your friends - word of mouth is one of the greatest forms of flattery.

To purchase supplies for this project, click 
HERE or email me at sunnygirlscraps@gmail.com!  


Do you enjoy making similar handcrafted items?  Not a Stampin' Up! Demonstrator?  Now is a great time to think about becoming a Stampin' Up! Demonstrator.  Starting on November 15th until November 30th, purchase the Starter Kit OR Digital+ Starter Kit for 50% off during the Simply Amazing Stampin' Up! Starter Kit Promotion which includes FREE SHIPPING.  


To sign up as a demonstrator and join my team, click HERE!


My recruit password is:  SUNNYGIRL


Sunny Stampin' & Scrappin'!

Pam Staples
SunnyGirlScraps
Stampin' Up! Independent Demonstrator


Project Recipe:

Ink: Basic Black (101179)

Designer Series Paper:  Love Letters (117162)

Cardstock:  Very Vanilla (101650), Basic Black (121045)

Accessories:  Basic Black Satin Ribbon (117285), Decorative Label Punch (120907), Distressing Essentials (118762), Circle Scissors Plus (112530), Glass Mat (112531)

Stamp Set:  En Francais (109521)

Gift Box with Panache!


Stylish Gift Box!

The past few days have been absolutely crazy in the Staples household between arriving home Sunday from a weekend scrapbook retreat at the beach, then my husband rushing off to work the moment I walked into the door, Kindermusik classes and Physical Therapy for the little one.  This week has just been flying by and I feel like I haven't accomplished nearly what I was hoping to accomplish which results in some "late" nights for me after everyone else has gone to bed.

This is a project I made this past weekend while scrapbooking at the beach!  I absolutely love these beach retreats.  A friend organizes the scrapbook & crafting beach retreats by renting a beach home.  There are usually 10 to 12 friends that go.  These retreats are turning into a twice a year tradition - next retreat we may even find a massage therapist to come in and provide some massages!

As for this stylish box, I made the box using two 12x12 pieces of cardstock.  I need to add that I was making this for my Secret Pal.  Of course, she happened to be sitting across from me asking all sorts of questions about the box and what I was planning to put in the box.  Admittedly, I was avoiding most of the questions by pretending I didn't know what she was "asking" or by looking dazedly confused as a result of my drug induced haze caused by the sinus infection I was getting over.


Isn't this box beautiful with a classic style?  The background paper isn't a Christmas themed paper but I love how using a Christmas stamp set makes the box into a great gift box.  The "Top Note" design is raised using dimensionals so the Basic Black Satin Ribbon slips underneath.  As mentioned previously, I used 12x12 Cardstock with the cover being Very Vanilla and the base of the box (not shown) being Basic Black.  The depth of the sides is 3 inches.

To make the base of the box, I scored the base at THREE inches on each edge then cutting in 3 inches along ONE of the intersecting corners doing this 4 times.  Using Sticky Strip, I folded along the score line to create the box shape and used the sticky strip on the flap edges to assemble the box. 

The top of the box was made using the same directions as the base of the box except I scored at 2 15/16th to make the cover easier to remove otherwise I find the cover sticks and is difficult to remove which can damage the base of the box.  With a box this beautiful, I would want to try to preserve the integrity of the box so it can be reused.

Finally, I decorated the box using the Love Letter Designer Series Paper and Riding Hood Red Cardstock on the top and each side of the cover of the box.  Adding extra decoration also creates a stronger box.  Using the Big Shot and Top Note die, I cut out the top design element using Basic Black and Very Vanilla Cardstock then I used the new Stampin' Up! Distressing kit with the charcoal dye ink and "blank" rubber stamp to add a distressed appearance to the Very Vanilla Cardstock.  I am in LOVE with the look that this distressing ink creates when used with the "blank" rubber stamp.  With some trial and error I was able to figure out what works best for me when trying to apply the distressing ink.  I also used the French Script Background Stamp to add to the "distressed look" making certain the image wasn't clear.  The last step was to stamp the tree, apply the ribbon and one button to the back of the Top Note which was then attached to the box.

SunnyGirl Tips:

  • Find time to enjoy the things that you love!
  • When using the distressing kit, lightly brush the "blank stamp" in and onto your cardstock while not worrying about the final outcome because you WANT a distressed look - not a perfect, uniform look!
  • Boxes can be a lot of fun to make.  Find a basic pattern such as a square box design and get creative with the size - Square is an easy box style to work with!

Like this project?  Please share your thoughts or questions by leaving me a comment below.

To purchase supplies for this project, click
HERE or email me at sunnygirlscraps@gmail.com!  

Do you enjoy making similar handcrafted items?  Not a Stampin' Up! Demonstrator?  Now is a great time to think about becoming a Stampin' Up! Demonstrator.  Starting on November 15th until November 30th, purchase the Starter Kit OR Digital+ Starter Kit for 50% off during the Simply Amazing Stampin' Up! Starter Kit Promotion which includes FREE SHIPPING.  To sign up as a demonstrator and join my team, click HERE! My recruit password is:  SUNNYGIRL

Sunny Stampin' & Scrappin'!

Pam Staples
SunnyGirlScraps
Stampin' Up! Independent Demonstrator


Project Recipe:

Cardstock:  Basic Black 12x12 (119922), Very Vanilla 12x12 (119951), Riding Hood Red (111348)

Designer Series Paper:  Love Letter (117162)

Accessories:  Big Shot (113439), Top Note Die (113463), Basic Black 5/8" Satin Ribbon (117285), Basic Black 1 1/4 Striped Grosgrain Ribbon (115615), Very Vanilla 1/8" Taffeta Ribbon (119960), Designer Buttons - Brights Old Olive (119747), Distressing Essentials Kit (118762)

Ink:  Basic Black (101179), Old Olive (102277)

Stamp Sets:  Snow Swirled (111690), En Francais (109521)

Snow Swirled
En Francais


Simply Amazing Stampin' Up! Starter Kit Promotion


Simply Amazing Stampin' Up! Starter Kit Promotion!

Wow! This is such a wonderful opportunity!

What else do you call a deal were you receive over $310.00 in Stampin' Up! product for the great price of $87.50 with FREE shipping. You call it a Stupendous Stampin' Up! Starter Kit Promotion where you can choose between the Standard Starter Kit or the Digital+ Starter Kit and purchase the kit at 50% off the regular price of $175.00 for over $310 worth of paper or digital crafting as well as your business supplies. If you've ever considered becoming an Independent Stampin' Up! Demonstrator then now is the time to join.  This is an unbelievable opportunity for anyone that has ever given thought to becoming a Stampin' Up! Demonstrator.

This opportunity starts on November 15, 2010 and ends on November 30, 2010! Now is definitely the time to become a Stampin' Up! Demonstrator with all the wonderful benefits of being an Independent Demonstrator with a great company.

To sign up online, click HERE! Then enter my password: Sunnygirl.


Wow! I love being a Princess.


I just had to share that I really enjoyed participating on the Royal Blog Tour this past weekend.  When time allowed, I was able to visit many of the other blogs on the tour but I'm still going back to look closer by going directly to the website at www.royalblogtour.com where I can access links to all the other blogs that were on the tour.

If you haven't had a chance to check out the whole tour, there is still time.

In the meantime, I'm preparing to participate in a local elementary school craft fair (if I'm accepted) as well as a community craft fair that myself and a few neighbors are putting together. 

This past weekend I also enjoyed a weekend getaway scrapbooking and crafting on Topsail Island!  It was very relaxing and so much fun - A shout out to my Cary Table Scrapps craft group!  I love you ladies along with Jen as our fearless leader planning these getaways.

Sunny Stampin' & Scrappin!

Pam Staples

Royal Blog Tour - Party This Way!


Party This Way! 

Good day and welcome my royal patrons!

I am Princess Pam and tis' a "Sunny" time for a Royal Tour!  Verily, I welcome thee to the SunnyGirlScraps Royal Palace with a merry Huzzah.  I pray thee has enjoyed visiting the other Royal Castles!  Tis' many wondrous ideas and projects being shared by my fellow Princesses. Now, twould please me greatly to have thee peruse my Castle.  

Mayhap thee will find inspiration here!  Tis' time to "Party This Way" as I highlight this stamp set.  In faith, 'twas easy to use this fun stamp set as 'tis especially great for creating party themed cards and favors.  Most recently, I used the "Party This Way" stamp set to create invitations for my son's first birthday along with party favors, decorating his birthday hat and his birthday card along with creating a couple of scrapbook pages!

Verily thee may also desire the opportunity to win some blog candy!   To be entered into a drawing for blog candy, thee MUST send an email to sunnygirlscraps@gmail.com and include thy NAME along with thine EMAIL so I may contact thee if thou dost win.  I also pray that thee would leave a comment on my post.

Prithee will you come along and "Party This Way"...

Hear Ye! Hear Ye!  Thou hast been issued an invitation to "Party This Way."  This was a fun invitation to make for my son's 1st birthday and 'twas wonderful to have my non-crafty husband help with making 50 of these invites!  I came up with the design and my husband actually did most of the cutting and punching while I stamped and assembled the pieces.  Pray tell, mine husband did a wonderful job did he not?


Now, every little lad must have a cute birthday hat for his celebration!  I used the Celebrations Party Hats (Item # 118716) to make party hats for all the royal lads and ladies in attendance.  Of course, the Royal Prince required a specially decorated hat showing that he was the birthday lad turning one!  Along with the hats, each little royal lad and lady in attendance received a party favor.  For the party favor, I used the Candy Wrapper die for the Big Shot then decorated the Candy Wrapper with the Celebrations Designer Series Paper and the "Party This Way" balloons.  Inside the Candy Wrapper were the small party bubbles.


The birthday card for my little Prince was kept simple.  This card design was cased from a swap I participated in with my upline.  I loved the simplicity of the design and my husband loves monkeys.  Inside the card, I layered a piece of whisper white cardstock and I stamped one candle in honor of little Prince turning one.


Alas, thou ist almost to the end of the Castle.  My final two projects showcase a scrapbook pages I've created for my little Prince.  As you can see, my little Prince actually wore his party hat!  I absolutely love this scrapbook page with a classic layout.  The photos are the main feature sandwiched between the title with the accents being stamped images from the "Party This Way" stamp set.  The second scrapbook page focuses on the guest autographs.  I started the "autograph page" tradition with my nieces and plan to continue it with my little Prince.


Alas, Good Friends, 'tis with sorrow that we've come to the end of my Castle for this Royal Tour!  'Twas all my pleasure as thee host and I pray that thee enjoy the other Royal Castles of the Royal Blog Tour.  I thank thee for thine visit and wish you a fare thee well on your travels.

If thine has any questions, don't hesitate to email me at sunnygirlscraps@gmail.com.

Sunny Stampin' & Scrappin'!

Royal Princess Pamela Staples

BLOG CANDY

Perchance though wouldst desire the opportunity to win some blog candy!   To be entered into a drawing for blog candy, thee MUST provide your name and email address which may be sent via email to sunnygirlscraps@gmail.com or include the information in your comment.  The second requirement to winning Blog Candy is having thee leave a comment on my post.

If thou hast met these requirements, in faith thee will be entered into a drawing to win the Party This Way Clear Mount Stamp Set AND Celebrations DSP:
Celebrations Designer Series Paper

Party This Way Clear Mount Stamp Set

Project Information:
Party This Way Stamp Set

Highlighted Stamp Set:  Party This Way (w:  118744; c: 120609)

Ink:  Real Red (103133), Pacific Point (111837), Daffodil Delight (119667), Pear Pizzazz (119784),

Cardstock:  Bashful Blue (105120), Real Red (102482), Pacific Point (111350), Daffodil Delight (119667), Pear Pizzazz (119795), Vellum Paper (101839)

12x12 Cardstock:  Bashful Blue (119973)

Designer Series Paper:  Celebrations (117164)

Accessories:   Celebrations Party Hats (118716), Quick Accents - Celebrations (118708), Big Shot (113439), Candy Wrapper Bigz L Die (120890), Square Lattice Embossing Folder (119976), Alphabet Simple Letters (115960), Designer Buttons - Subtles (119745), Oval Punch (119863), Scallop Oval Punch (119856), Cog Punch (118873), 1 3/8 Circle Punch (119860), 1 1/4 Circle Punch (119861), 1 Circle Punch (119868), 1/2 Circle Punch (119869), Hemp Twine (100982), Round Tab Punch (119864), Brads - Brights (119740)

Other Stamp Sets:  Inviting (w: 119153; c: 120630), Fox & Friends (w: 117020; c: 118565), Tiny Tags (w: 118091; c: 118592), Schoolbook Serif Numbers (111680)


A Christmas Blessing. Rejoice!


Rejoicing in Christmas!

For unto us a Child is born,
unto us a Son is given...
                     ~  Isaiah 9:6

I love the simplicity of this beautiful stamp set found in the current Stampin' Up! Holiday mini catalog.  As I hold my son, I can only imagine the love Mary and Joseph had for their son, Jesus.  Over the Christmas season, we should strive to remember that the true meaning of Christmas is the Birth of Jesus Christ as Lord and Savior.  All the gifts are wonderful and definitely enjoyed.  But it is just as wonderful to be the giver of gifts.  Homemade gifts are a wonderful way to share your love.

Here is the first card I've made using this stamp set which was for the card swap at the upline meeting I attended this past Sunday.  I used the Northern Flurry Embossing Folder for the base of the card then I used a dauber to sponge Shimmer Paint over the raised image.  The snowflakes remind me of stars.  I then used the 1 1/4" striped grosgrain ribbon tied with Hemp Twine and three little jewelry tags with one stamped with the "merry" stamp from the Tiny Tags stamp set.  Finally, I stamped the image of Joseph, Mary and Baby Jesus with the Whisper White Craft Stamp and embossed using clear embossing powder.

SunnyGirlScraps Tips:

  • When embossing, remember to use the embossing buddy to help with easy removal of excess embossing powder.
  • A great way to apply shimmer paint to your projects is to shake your bottle then, using your dauber, daub inside the shimmer paint cover to pick up small amounts of the shimmer paint.  Apply to your project.
  • Rules of Composition - Fill your Frame!  When photographing subjects, try to fill the frame with the main subject.  You'll have greater impact and fewer distractions in the photo.


Like this project?  Please share your thoughts or questions by leaving me a comment below.

To purchase supplies for this project, click HERE or email me at sunnygirlscraps@gmail.com


Sunny Stampin' & Scrappin'!

Pam Staples

12 Weeks Of Christmas for Newsletter Subscribers!


12 Weeks of Christmas!

Oh, I just have to share that I've had such a great response so far to my 12 Weeks of Christmas Newsletter exclusive.  There is still time to catch many great ideas.

If you haven't signed up for my newsletter, now is a great time! 

To sign up for my newsletter, just fill in your email on the sidebar located to the left of this post!  It is that simple.  You'll start receiving the 12 Weeks of Christmas newsletter exclusive which is mailed out every Wednesday into mid-December.

Also, if you have any friends or family members that enjoy crafts, please take the time to email them about SunnyGirlScraps and encourage them to sign up for my blog as well as my newsletter!

Sincerely,

Pam Staples

Handmade Holiday Stampin' Up! Bundle Promotion


Ho Ho Ho!  
A Merry Bundle of Joy
from Stampin' Up!


Look at this wonderful new promotion from Stampin' Up!  From October 19th to December 16th, choose from several holiday bundles guaranteed to bring a smile to your face!  These bundles are packed full of gorgeous Stampin’ Up!® products—perfect for creating cards, gift packaging, and gifts—and all at 20% off!


To purchase any of these Holiday Promotion Bundles, click HERE or email me at sunnygirlscraps@gmail.com!

Need help with a project idea or these bundles?  I would love the opportunity to help you with your holiday shopping and projects even if you live several thousand miles away.  I can help you.

Sunny Stampin' & Scrappin'!

Pam Staples


Gone Batty!


Batty for Bats!

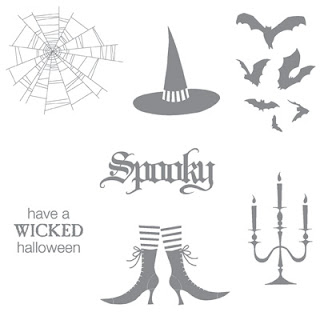
Yes, I've gone batty!  Batty for background bats that is...  On today's featured card project I used the bat stamp in the Wicked Cool stamp set to create a background.  This card needed less frills and more thrills.  As I stamped this card, I quickly started seeing a "spooky" theme developing but in a fun way.

This card is for my niece, Kamryn.  She is all tomboy and I knew I needed a "batty" background.


SunnyGirlScraps Tips:

  • When using a stamp to create a background, twist the stamp at different angles for a more random and natural looking background.
  • Stampin' dimensionals are a wonderful product offered by Stampin' Up! that helps lift items up so they don't look so flat on a card.  Adding dimension to a project helps create a sense of depth and interest.
  • Rules of Composition - Sense of Depth!  Are your cards 2 dimensional or 3 dimensional?  When you are laying out a card, do you think of ways to add depth?  To help with your card and scrapbook creations, consider creating a sense of depth.  I've often seen scrapbook pages as well as cards that have a lack of "something."  That "something" can be a lack of applying any rule of composition but often I see a lack of depth.  We have to choose our composition carefully to convey a sense of depth that was present in our creations. With photography you can create depth in a photo by including objects in the foreground, middle ground and background and this same principal can be applied to scrapbook pages and handmade cards.  Another useful composition technique is overlapping, where you deliberately partially obscure one object with another. The human eye naturally recognizes these layers and mentally separates them out, creating an image with more depth.
Like this project?  I love to hear from my blog visitors.  Please share your thoughts or questions by leaving me a comment below.

To purchase supplies for this project, click HERE or email me at sunnygirlscraps@gmail.com


Sunny Stampin' & Scrappin'!

Pam Staples


Card Recipe:

Ink:  Pumpkin Pie (105216), Basic Gray (109120), Daffodil Delight (119667), Basic Black (101179)

Cardstock:   Basic Black (121045), Basic Gray (121044) Rich Razzleberry (115316)

Designer Series Paper:  Wicked Fun Specialty (117400)

Accessories:  Basic Black Satin Ribbon (117285)), Circle Scissor Plus (112530), Glass Mat (112531), 2 3/8" Scallop Circle XL (118874), Oval Punch (119855), Scallop Oval Punch (119856), Scallop Edge Border (119882), Glimmer Brads - Basics (121003)
 
Stamp Set:  Wicked Cool (w:118738; c: 120600)


Wicked Cool

A Wicked Spooky Halloween


Spooky Elegance

I must admit that this was a difficult card to make especially since we don't celebrate Halloween in our family.  We prefer to focus on All Saints Day.   Even though we do not celebrate Halloween, there are many that do including my nieces.  I do make it a personal policy to not do anything overly scary. 

At convention this year, I won a prize patrol and you would never guess what I won!  Yep, I won a Halloween Stamp Set and designer series paper.  Just my luck - but it was free and I will use it the best that I can!

This is the card that I made for my oldest niece.  She is enjoys feminine touches.  So I included some lace and jewels.  The black flourish jewels are so fun and add an elegant touch.  Sponging is another technique I also enjoy.


SunnyGirlScraps Tips:

  • When using the Designer Jewels Black Flourish, follow the directions!  It is key to place the transfer sheet on top of the jewels and rub hard then peel back the original backing sheet.  Peel the backing sheet off slowly.
  • Once you have used the sponge daubers with a specific color, place a label on the dauber with the ink color so you always know what color is on the dauber.
  • Rules of Composition - Texture!  Texture is a wonderful way to add interest and dimension to your photographs and projects.  When people see texture in an image they can start imagining what it feels like to touch what is in the photo.  Texture is a good idea when your taking pictures of rocks, walls, surfaces, someone’s hands, or leaves. To reveal texture in a photograph, make sure the light is coming almost exactly from the side of the surface so it creates shadows in key places.

Like this project?  I love to hear from my blog visitors.  Please share your thoughts or questions by leaving me a comment below.

To purchase supplies for this project, click HERE or email me at sunnygirlscraps@gmail.com


Sunny Stampin' & Scrappin'!

Pam Staples


Card Recipe:

Ink:  Pumpkin Pie (105216), Basic Gray (109120), Daffodil Delight (119667), Basic Black (101179)

Cardstock:  Peach Pizzazz(119794), Basic Black (121045), Basic Gray (121044)

Designer Series Paper:  Wicked Fun Specialty (117400)

Accessories:  Designer Jewels Black Flourish (120987), Trim Lace Raven (120988), Pumpkin Pie Satin Ribbon (119749), Circle Scissor Plus (112530), Glass Mat (112531), 2 3/8" Scallop Circle XL (118874), Big Shot (113439), Embossing Folder - Square Lattice (119976)

Stamp Set:  Wicked Cool (w:118738; c: 120600)

Wicked Cool

Snowflake Christmas Tag


Fun Snowflake Treat Tag!


This was a fun project.  The "tag" is actually a folded card with a cellophane bag inside.  Think of how a tea bag sits inside its small packaging and that is what this card is based off.  We made a similar project as one of the make-n-takes from the 2010 Stampin' Up! Convention.  I loved the concept and thought it would be really cute as a Christmas Tag that included an extra little treat.

To create the "Tea Bag" Tag, I cut a strip of 8 1/2 x 11 cardstock down to 3 1/2 x 10 then scored a line at 4 1/4 and another line at 8 1/2.  With the shortest piece cut on both edges to create a triangular piece to fit into a slot made by using the word window punch.  The cellophane bag that I used on the inside is the Small Flat Cello bags from Stampin' Up! that I cut the size of the Cello bag down to 4".  The Cello Bag is attached inside the card with sticky strip.

I think that a small Dove chocolate would be a perfect treat to put inside the Cello bag as part of the tag.

SunnyGirlScraps Tips:
  • To make the "fish tail" on your ribbon, fold the ribbon in half then cut inwards from the two folded halves towards the knot.
  • When applying the Jewel Basic's use the tip of your paper snips to lift the pearl or rhinestone along with the adhesive from the backing (Paper piercer also works great).
  • Rules of Composition - Simplicity!  Simplicity is the method of keeping the information in your project relatively simple.  With photography, keep in mind that if your main subject is close, then your background should be very simple to avoid distractions.  Try to keep everything that is not important much less interesting than what’s important in the project or photo.  A key feature of "simplicity" is to avoid lines or objects that lead the eye away from the main subject of your photo or project.
Like this project?  Please share your thoughts or questions by leaving me a comment below.

To purchase supplies for this project, click HERE or email me at sunnygirlscraps@gmail.com


Sunny Stampin' & Scrappin'!

Pam Staples


Project Recipe:

Ink:  Classic Real Red (103133)

Cardstock:  Real Red (102482)

Accessories:  Oval Punch (119855), Scallop Oval Punch (119856), Snowflake Punch (119852), 1 1/4" Striped Real Red Grosgrain Ribbon (119768), Word Window Punch (119857), Small Cello Bag (103104), Hemp Twine (100982), Jewels - Basic Rhinestone (119246)

Stamp Sets:  Serene Snowflakes (115438); A Cute Christmas(w: 120825; c: 121133)
Serene Snowflakes

A Cute Christmas

A Revised Twist on Tags til Christmas


Another Tags til Christmas Color Twist!

Here is a second fun card using the Candy Cane Christmas Designer Series Paper which has an unusual color scheme for Christmas.  With this card, I used a different pattern and glitter brads to show how just a few small adjustments can change a look of a card.  Another change was the ink color used for the sentiment at the bottom of the card.

This card is based on the same layout that I posted the past two days but with a few changes.  The addition of the glitter brads took this card up a level but the change to glitter brads in the same color as the ribbon also added a new dimension.  Also, notice how I place elements so your eye is drawn to each item in a circular fashion.


SunnyGirlScraps Tips:

  • When creating a card or scrapbook page, think about different design concepts such as "Leading Lines."  Leading Lines are used to lure the eye deeper into the subject or project.  Straight, curved, parallel, or diagonal lines are all good at promoting interest.  In photography, good examples could be roads, rivers, streams, bridges, branches, or fences but there are endless things that could be used. In this project, my leading lines are found in the Designer Series Paper.
  • Grouping elements.  Different elements that are the same color grouped together help draw the eye towards that grouping.
  • Stampin' Up! punches are a great option to help you create interesting elements.  For example, I used two different punches on this card to help create interest.

Like this card?  Please share your thoughts or questions by leaving me a comment below.

To purchase supplies for this project, click HERE or email me at sunnygirlscraps@gmail.com


Sunny Stampin' & Scrappin'!


Pam Staples


 Card Recipe:

Ink:  Baja Breeze (111833)

Cardstock:  Baja Breeze (111352), Whisper White (100730), Blushing Bride (119796)

Designer Series Paper: Candy Cane Christmas (120809)

Accessories:  Scallop Trim Border Punch (118402), Decorative Label XL Punch (120907), Real Red 1/8" Taffeta Ribbon (119251), Glimmer Brads - Brights (121006)

Stamp Sets:  Tags Til Christmas (w: 120847; c:121169); Curly Cute (w: 117014, c: 120510)

Tags til Christmas
Curly Cute

A Color Twist on Christmas Cards


Tags til Christmas Color Twist!


Here is a fun card using the Candy Cane Christmas Designer Series Paper which has an unusual color scheme for Christmas.  This color scheme can be a fun challenge.  I'm slowly falling in love with this color combination but I can't say it will ever be an absolute favorite!  Personally, my favorite Christmas color scheme is Navy Blue.

This card is based on the same layout that I posted yesterday but just added a few embellishments.  The addition of the glitter brads took this card up a level.  Also, notice how I place elements so your eye is drawn to each item in a circular fashion.


SunnyGirlScraps Tips:

  • When creating a card or scrapbook page, think about different design concepts such as the Rule of Thirds often used in Photography and by artists.  The Rule of Third breaks an image into 9 sections (think of a tic tac toe grid) then elements are placed so they follow along those lines.
  • Grouping elements.  I also like to group elements to help draw the eye to look at all aspects of a card.  For example, I grouped the three brads with the bow.
  • The Color Coach is an awesome tool offered by Stampin' Up! that can help you find a different color combination you may not have considered.

Like this card?  Please share your thoughts or questions by leaving me a comment below.

To purchase supplies for this project, click HERE or email me at sunnygirlscraps@gmail.com


Sunny Stampin' & Scrappin'!


Pam Staples


 Card Recipe:

Ink:  Real Red (103133)

Cardstock:  Baja Breeze (111352), Whisper White (100730), Blushing Bride (119796)

Designer Series Paper: Candy Cane Christmas (120809)

Accessories:  Scallop Trim Border (118402), Real Red 1/8" Taffeta Ribbon (119251), Glimmer Brads - Brights (121006), Heat Tool (100005), Heat & Stick Powder (100625), Dazzling Diamonds Stampin' Glitter (102023), Decorative Label XL Punch (120907)

Stamp Sets:  Tags Til Christmas (w: 120847; c:121169); Curly Cute (w: 117014, c: 120510)

Tags til Christmas
Curly Cute

A Cute Christmas


Whimsical and Fun!


This weekend I took some time to create some fun and whimsical cards using the stamp set "A Cute Christmas."  There is something sweet and innocent about this set that I just love.  It has simple, yet fun designs.

I also used the Candy Cane Christmas Designer Series Paper found the in the current Holiday Mini Catalog.  This paper has some non-traditional colors thrown in with the traditional .  You'll find the traditional Red and Green with a non-traditional "blushing bride" pink and "Baja Breeze" blue.  The color combination in this paper can be a challenge but also gives you the opportunity to explore new avenues in color.

This card is a sweet and simple design that is quick to make.


Like this card?  Please share your thoughts or questions by leaving me a comment below.

To purchase supplies for this project, click HERE or email me at sunnygirlscraps@gmail.com


Sunny Stampin' & Scrappin'!


Pam Staples


Card Recipe:

Ink:  Baja Breeze (105209)

Stampin' Write Markers:  Baja Breeze (120965), Garden Green (100080), Blushing Bride (119801)

Cardstock:  Baja Breeze (111352), Whisper White (100730), Blushing Bride (119796)

Designer Series Paper: Candy Cane Christmas (120809)

Accessories:  Pinking Hearts Border Punch (117649), Scallop Rectange Clearlit (118872), Big Shot (113439), Real Red Grosgrain Ribbon (109034)

Stamp Sets:  A Cute Christmas(w: 120825; c: 121133), Four The Holidays (116921)

A Cute Christmas Stamp Set

Four The Holidays Stamp Set

Just Believe Candle Reflections


Stamping on Candles

Just Believe in Watercolor!


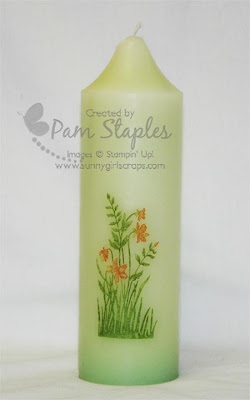
I've had this Partylite candle sitting in my bathroom and after my first foray into stamping on a candle I started looking for more candles to stamp on!  This candle which is a similar shade to Certainly Celery was just begging to be stamped on.  It is a fairly tall pillar candle and it needed a stamped pattern that was of a taller nature.

I love the "Just Believe" stamp set that 2010 Convention attendees received for our Make-n-Takes.  For the effect on this candle, I colored the image with the Stampin' Write Markers lightly spritzing the stamp with a water mister after I was done coloring the stamp.  I then stamped the image onto a sheet of tissue paper.

The resulting affect on the candle is beautiful with this candle now sitting front and center on my bathroom vanity.


SunnyGirl Tips:

  • I wrap parchment paper around the candle then heat with my heat gun.  The one time I used wax paper I didn't like the way it melted with the candle and I had issues with air bubbles.
  • When misting a stamp that has been colored with the Stampin' Write Markers, use a very fine mister. 
  • Attache stamped image to the candle using a small amount of adhesive such as snail adhesive. 

    Like this card?  Please share your thoughts or questions by leaving me a comment below.

    To purchase supplies for this project, click HERE or email me at sunnygirlscraps@gmail.com

    Sunny Stampin' & Scrappin'!

    Pam Staples


     Project Recipe:

     Stampin' Write Markers:  Wild Wasabi (120975), Always Artichoke (105113), Tangerine Tango (120974), Peach Pizzaz (119801)

    Stamp Set:  Just Believe  (w: 116948; c: 120453)